

Stop taps are often called stopcocks, most people will know them as stopcocks. A stop tap is often found on the rising water main of a property and is used to isolate the water supply. Normally there are two stop taps, one on the boundary of the property, which is the water companies responsibility and one on the inside of the property, which is the owners responsibility.
stop tap is connected to the supply pipe by a compression nut and olive at each side of the tap. You can see from the picture Below that there is a directional arrow on the tap. The arrow must point in the direction of the flow of water.
Stop tap components
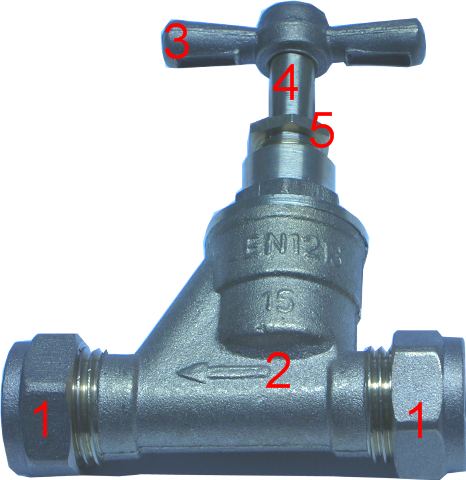
1. Compression Nuts
2. Direction of flow arrow
3. Handle
4. Spindle
5. Gland Nut
When opening a stop tap open it fully by turning it anti-clockwise as far as it will go and then turn it back half a turn, this will help to prevent it from seizing in the future!
Fix a leaking stop tap
A Leaking stop tap is normally easy to remedy and can often be fixed in a matter of minutes, Below are the instructions to fix leaks from several different places on the stop tap.

First we need to identify exactly where the stop tap is leaking, there are only three possible places where a stop tap can leak-
1. Compression Nuts
2. Gland Nut
3. Head gear joint
If the leak is on the gland nut please see here- Repack stopcock gland
If the leak is on the Head gear joint you will have to isolate the water and then undo the nut and apply some PTFE tape to the threads, this article should help- Replace stop tap washer
Leaking compression nuts
If water is leaking from one of the two compression nuts, then fixing it should be relatively straight forwards.
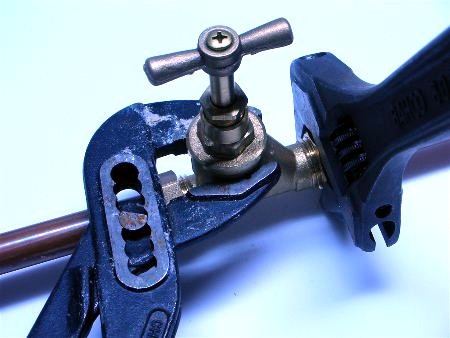
Before trying anything else it is a good idea to try and tighten the nuts as this will often stop the leak. Grip the body of the tap with some water pump pliers and then tighten the nut by turning it clockwise, using a suitable spanner.
If this does not fix the leak, then wrap some PTFE tape around the olive. To do this you will have to ensure that the water is isolated to the stop tap.
Once the water is isolated you can undo the nut by turning it anti-clockwise. Wrap some PTFE tape around the olive and then re-tighten the nut.