

Silicone sealant can really finish off a job if done correctly, hopefully the advice below will help you get the perfect finish.
Most people are not happy or confident about using silicone sealant, I can sympathize with them but there is really nothing to it that a little practice and good advice will not sort out!
The first mistake people make is applying too much silicone, this is easily done and can make a complete mess!

This Quadrant Tiling was secured and sealed with silicone!
The best advice I can give you is to apply the silicone sparingly, If you miss a little bit you can always go back afterwards and fill the gap! After applying the bead DO NOT WET YOUR FINGER WITH SALIVAto run down the bead, this is not effective!
AFTER APPLYING THE BEAD OF SILICONE WET YOUR FINGER WITH WASHING UP LIQUID.
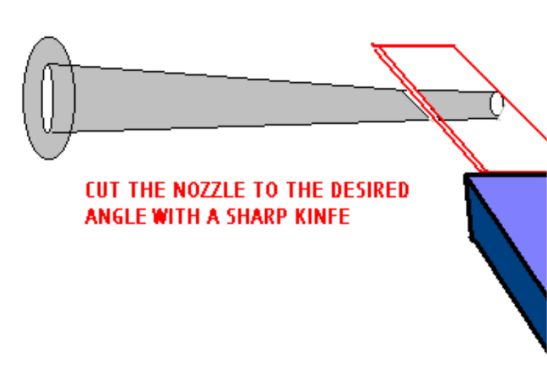
Cut the silicone nozzle using a sharp knife to the correct angle
Keep plenty of washing up liquid to hand when using silicone and plenty of Kitchen towel as you will need somewhere to wipe the excess silicone!
Wait until the next day and remove the washing up liquid by wiping, this normally does not affect the silicone in any way at all!
Silicone has some excellent properties, mainly it's water resistance and flexibility.
This makes it ideal for use anywhere, it's uses are unlimited. There is even a heat resistant version of silicone!
SEALING AROUND A BATH
Sealing the edge around a bath is normally done with either silicone sealant or bathroom and kitchen sealant, there is a small difference between the chemical make up of these two products but they appear identical.
Before beading around the bath it is essential to remove any traces of old silicone, this can be done by cutting it away with a sharp knife or you can now purchase "silicone eater" which makes removal far easier!
Ensure the surfaces to be beaded are 100% dry and clean!
Remove the bath panel from the bath and ensure that it is supported sufficiently underneath, most baths when fitted only have a metal frame around them and a set of legs! This is not really good enough to support the bath fully and as a consequence the weight of the bath when filled with water and the weight of the adult in the bath causes it to flex and move away from the wall slightly therefore breaking the bead of silicone. Cast iron baths do not suffer from the flexing problem but can move slightly with all the weight in the bath!
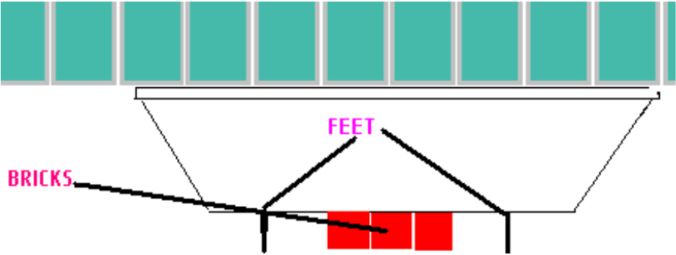
Ensure the bath is supported enough underneath, if necessary us bricks or blocks of wood to ensure the bath is supported adequately
To ensure the bath does not move much or flex it is a good idea to place either some house bricks or blocks or wood between the bottom of the bath and the floorboards, in most cases this will stop the bath from moving and therefore breaking the seal! Ensure that the bricks/blocks of wood are a tight fit between the bottom of the bath and the floorboards, you may need to use a combination of different size materials to get a tight fit between the two! Replace the bath panel. Now fill the bath to just below the overflow, this will mean the bath is pulled slightly from the wall, you will not see the movement as it is minute! Apply a small but constant bead of silicone all the way around the edges of the bath which are to be sealed, now cover your beading finger of choice (it will normally be your middle or forefinger) with washing up liquid and draw it along the bead of silicone. If you get a build up of silicone on your finger wipe it off with kitchen towel or similar, wet finger again with washing up liquid and continue until finished. Remove any excessive silicone with washing up liquid and kitchen roll. Leave till the next day and wipe clean with a damp cloth. Although you can normally pick silicone sealant up for around a pound a tube it is always best to save what you can as it always comes in useful, do this by screwing a tight fitting screw into the nozzle, this stops the air getting to the silicone and curing it!
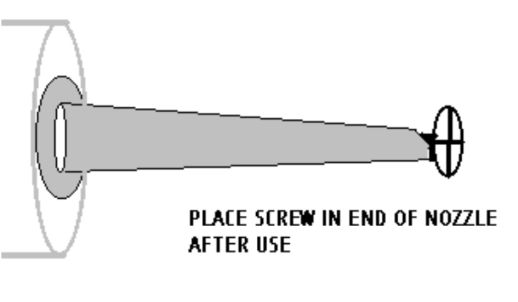
Place a screw in the ends of the silicone nozzle when finished to prevent the silicone from curing
Here are some videos that should help-
Removing silicone sealant video