

How to tile a concrete or wooden floor
You can tile most wooden floors as long as the correct preparation work is carried out first, the type of preparation depends on what type of tiles you are going to be using-
Ceramic, Porcelain and most man made tiles you have the following options:-
- Secure the existing floorboards to the joists and replace/repair any damaged areas. Over ply with 12mm WBP plywood screwed every 150mm.
- Remove the existing floorboards back to the joists and replace with 25mm WBP plywood fixing noggins where boards join across joists.
For Stone, marble or natural products the floor need to be a little more rigid:-
- Secure the existing floorboards to the joists and replace/repair any damaged areas. Over ply with 18mm WBP plywood screwed every 150mm.
- Secure the existing floorboards to the joists and replace/repair any damaged areas. Glue and screw 12mm Aquapanel to the existing floor using rapidset flexible tile adhesive and Aquapanel screws, this gives the same rigidity as 18mm ply with a smaller increase in height.
- Remove the existing floorboards back to the joists and replace with 25mm WBP plywood fixing noggins where boards join across joists.* Floorboards refers to either standard tongue and groove timber or flooring grade chipboard.* WBP stands for Weather and Boil Proof.
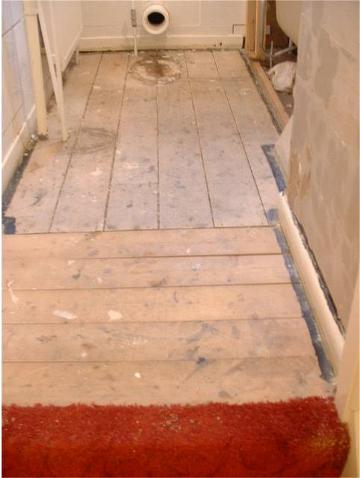
Here we have removed the old floor covering to expose the floor boards, the floor has been scraped and is clean and has no nails etc. sticking up. When tiling a bathroom floor it is much easier to remove the toilet and sink and then replace them once the tile adhesive has set fully. For this reason this is a job best done when the house is empty for a day or two.
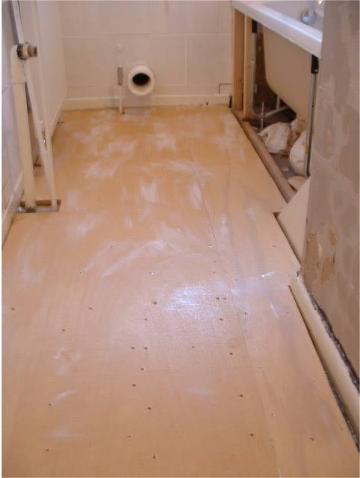
The floorboards have now been over boarded and the WBP Plywood has been screwed down every 150mm. It is important that all screw heads are sunk below the surface of the Plywood, for this reason I use self countersinking screws.
If you are using Aquapanel you must use rapidset flexible tile adhesive and Aquapanel screws.
DO NOT PVA the floor unless the tile adhesive that you are using specifies it.
If you are tiling onto a solid floor then please disregard the information above.
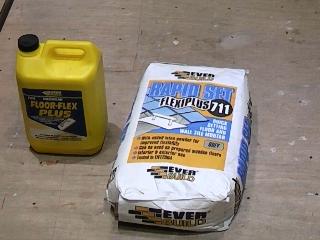
This rapid setting adhesive by everbuild can be used on wooden floors by mixing it with the correct amount of floor flex plus, if you mix it with water it can be used on concrete floors without the ad mixture

It is a good idea to lay out the tiles on the floor and cut each tile before mixing the adhesive as it goes off very quickly and is normally only workable for 30 minutes or so. You must leave a 6mm Gap around the perimeter to accommodate any movement, if you don't the tiles could eventually break! A special adhesive is required for wooden floors so ensure that you have the correct type of adhesive.
When you have cut all of your tiles to the correct shapes you can stack them neatly at the side of the room, making sure you keep them in the correct order.
You can now mix the adhesive, with some adhesives for wooden floors you mix a dry powder adhesive with a liquid which makes the adhesive a lot more flexible and so will not crack with movement.
After mixing the adhesive you only have about 30 minutes to use it up or it will skin over and have to be disposed of. Refer to the instructions for the adhesive that you are using for mixing and drying time advice.

Using a notched trowel and starting in the room opposite the door you can proceed to lay the tiles, this should be easy as they have all been cut to size earlier.
Work your way to the door and then leave the tiles to set for what ever time the adhesive manufacturers stipulate, you can then return and grout between the tiles and then leave them for a further couple of hours.
DO NOT WALK ON THE EDGES OR CORNERS OF THE TILES UNTIL AFTER THE JOINTS HAVE BEEN GROUTED AND THE GROUT IS DRY!
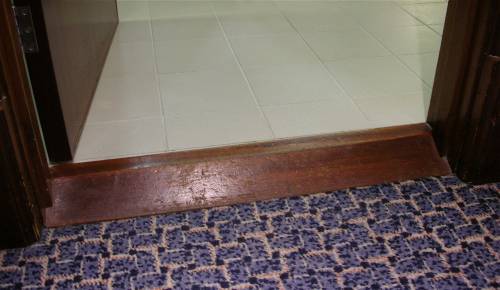
If you find that the new floor will be higher than the existing floor, then you can use a piece of wood as a ramp, like the one in this picture. This can easily be made by a joinery shop and will help to blend between the two levels.
If you prefer you can watch the Floor tiling video