 |
How to plan a segmented vase |
 |
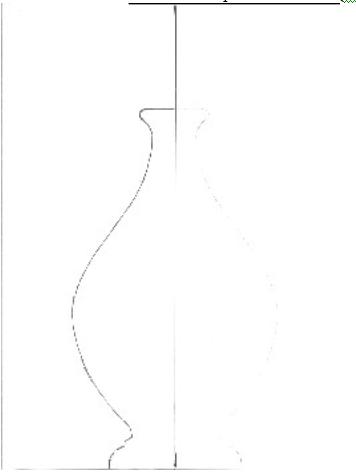
Segmented vase turning gives you the freedom to experiment with different designs and sizes. When you turn a vase from a solid log, the size of the vase is determined by the diameter of the log. Another restriction when turning from solid wood is that the object being turned is the same colour. This can be eliminated with segment turning. Basically segment turning is gluing several rings of wood on top of each other to make the shape you desire. You have no limitations regarding type of wood used, height of object, and diameter of object as long as you stay within the limits of your wood turning lathe. I am an amateur myself and below I have attempted to describe an easy way how you can plan your segmented turnings. We will start this tutorial by taking an A4 paper and folding it vertically exactly in the middle and marking over the fold. |
|---|
 |
The second step requires that we know what thickness of rings we are going to glue on top of each other. This is necessary for two things. First we must take a look at the wood we have available, and after determining how high we can make the rings from this wood we have to decide how many rings we are going to glue on top of each other to make our object. In the examples below I’m going to make a vase with 9 rings of 1 inch thickness. Therefore the final height of the vase is going to be 9 inches. |
|---|
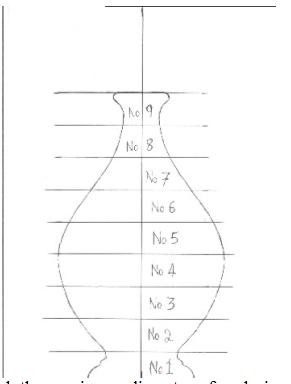 |
When the shape is to our liking, we fold the paper along the vertical line and trace the design on the opposite side. Next we start at the bottom and mark a horizontal line every inch, and give each ring a number. |
|---|
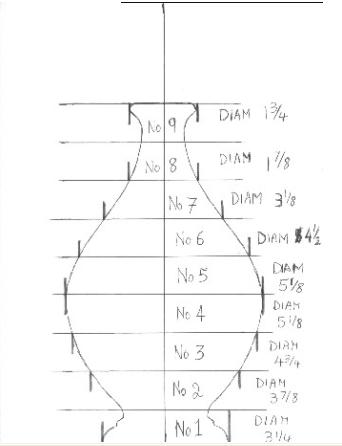 |
Now we have to mark the maximum diameter of each ring and measure it. |
|---|
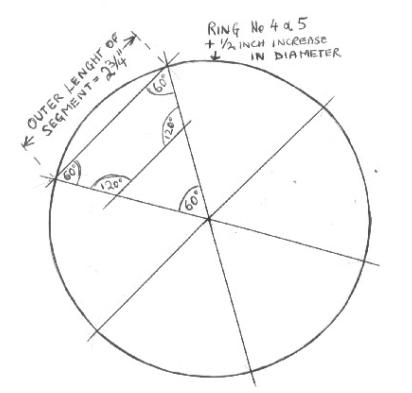 |
I always add ½ inch to every diameter because otherwise the vase will be a bit smaller than what you designed when you turn it. In this tutorial I have divided each ring into 6 segments but that is up to you. As an example I have taken rings No 4 and No 5 which have 51/8 inch diam. To this I add the ½ inch so the diameter becomes 5 5/8 inches. Now I draw a circle having a diameter of 5 5/8 inches and divide it into 6 equal parts. |
|---|
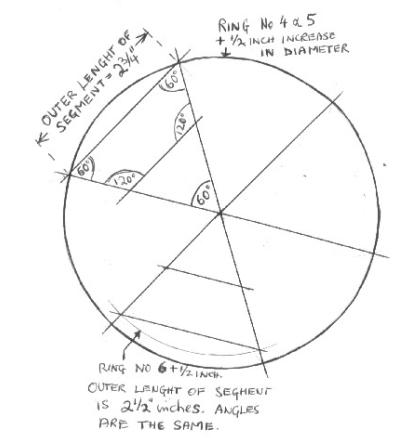 |
As you can see this diagram has given me the length for each segment and the angles as these are necessary when you are cutting the wood on your circular or miter saw. Therefore now for rings No4 an No 5 We need 12 segments whose outer length is 2 ¾ inches long. As you can see here we can use the same diagram to find the lengths of the other segments in the other rings.( Shown here is the segment for ring No 6). |
|---|
When we know the length of all the segments in our object, we prepare a cutting list. Then we glue each ring separately and when all the rings are ready we glue them on top of each other always centered as much as possible. I always like to make the bottom and top ring from a solid piece and if possible double their thickness. This is because when they are solid it is easier to attach to the centre points of the late and I make them thicker so that I have a bit of extra wood which I can trim at the end of the turning. As I said before, I am an amateur myself. This tutorial is just a quick explanation to get you started. The best way to gain experience is through practice. When things go awry try to see why and don’t be discouraged. Wishing you long hours of satisfactory segmented turning. |
|---|