

Fitting Marble tiles can be difficult, if you are uncertain then it is probably best if you leave it to the professionals. Because of the cost of the marble in the first place the last thing you want to do is make a costly mistake, but if you have had some previous experience of tiling and you feel confident to have a go yourself you will find the information you require below
Honed or Polished Marble?
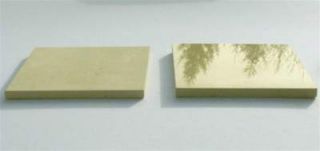
The two tiles on the left are identical except the one on the left is honed and the one on the right has a polished finish. It is important that you know which finish you require before ordering any tiles.
How to cut marble tiles
Marble tiles are best cut with a diamond wheel cutting machine, it is not possible to cut them using a traditional slide and snap tile cutter, please see here- Wet tile saw
Marble Adhesive
The adhesive you use is as much Dependant on what the marble is to be fixed too as much as the stone itself. As a general rule of thumb if the marble you are fitting is white, light or anything other than a very dark colour it’s important to use a white cement based adhesive suitable for natural products. This avoids the possibility of the stone staining from any dyes or colours in the adhesive. If it happens to be a black marble then a dark Grey adhesive is more suitable.
A solid bed trowel should be used in any situation where you consider the stone will be translucent. Providing a full coverage on the back of the stone will not stop discoloration but will discolour the tile as whole if it does happen, therefore reducing the possibility of seeing a row of lines from a serrated trowel if the adhesive happens to discolour the stone very slightly.
Fixing Marble tiles
For wall tiling pleas see here- Tiling a wall
If you are tiling onto a wooden floor please see here Tiling a floor
Marble Finishing
You’ve fitted your marble and now it’s time to grout. The first thing you must do is seal the stone thoroughly with a quality sealant, we generally recommend Lithofin Stain Stop MN. This should be done 24 hrs after the stone has been fitted, this delay allows for a large percentage of the moisture in the adhesive to evaporate and not be trapped in by the impregnating sealer. Allow this to dry for at least an hour and mix your grout. Always test the grout on an off cut of marble before you go ahead and start grouting your newly tiled wall. This is very important as many grouts (particularly dark or coloured) can contain pigments that react adversely with the marble itself. Once you’re satisfied that the grout is acceptable, grout your finished tiling and carefully wash and polish the residue as normal. Tile grouting 24 hrs later once the grout has dried, the completed tiles and grout all require another one or two coats of sealant.