

Garage conversion floors
One thing to remember is the regulation regarding a ‘fire step’ down into a garage from a habitable room. Once your conversion becomes a habitable room this regulation is no longer needed. If however you intend to divide your garage up into a habitable space and a car parking space you will need a 4” step down into the garage area.
It’s highly unlikely the existing garage floor will contain any insulating material in which case you’ll need to introduce it to some sheet insulation. You could go for a ‘floating floor’ or a sand/cement screed finish, sometimes dependent on the depth you have to play with. If the access door to the garage is near the back then the floor will likely be near its highest point. A sloping concrete finish is usually incorporate into garages to prevent puddles and wash from any wet weather, which means the door will be the lowest. If however the garage is a built in design and relatively modern it may well already be insulated and will require little or no extra. However, if you cannot prove the existence of insulation to the building inspector you may have to dig a test hole in order to do so or it may well be easier to go ahead an insulate it anyway saving the hassle.
When screeding the floor you’ll need a minimum thickness of insulation followed by a minimum thickness of screed. Reinforced screed (added fibres) is best. The step down into the garage from the finished floor level in the access door will give you a fixed height to work to in an extension type conversion whereas a detached version will give you some room to play with. Floor screeding comes under ‘plastering’ and is essentially a 5:1 sharp sand:cement mix, just moist, not wet and laid to a depth of 50-75mm with a float finish (smooth and flat) you can finish as per normal. It’s a skilled trade similar to plastering so it pays to have a professional rather than try and do it yourself if you’ve never done it before. A diyer working from written instructions for the first time is likely to make a mess of it and waste the price of the materials. The insulation you install will depend on your step down height but will need to at least achieve the required ‘u’ value. In 2009 50mm of cellotex under 50mm of reinforced screed was sufficient.
Floating floors consist of a layer of sheet insulation under a layer of solid flooring such as chipboard tongue and grooved 8 x 2 sheets. The problem here is the existing slope of the floor. An external grade levelling compound will level the floor before installing the uniform sheeting. Getting the existing floor perfectly level will result in a perfectly level floating floor. There's also nothing to stop you increasing the insulation to make up height or even doubling up the chipboard flooring. There's also nothing to stop you final finishing for the last millimetre with a flexible floor levelling compound.
Cellotex is usually available in multiples of 25mm thickness and chipboard flooring in 18mm or 22mm. It pays to get the water resistant type, non water resistant will be cheaper by about a pound a sheet and you only need 10 sheets per garage so the extra tenner is worth it. A down side to installing a floating floor is if there is a water leak it can remain undetected for some time as the water can immediately run over the edge of the board down into the insulation and build up until what your left with is a real genuine ‘floating’ floor and it will rot any timber over a period of time, treated or not. A screed floor will dry out, floating floors need replacing…
Underfloor heating can be installed with either method and water heating can be installed just as easily as electric due to the insulation required, in fact it’s a good idea purely because of the insulation. By the time you’ve finished wrapping your new room in insulation, a relatively inexpensive (background heat) electric mat style underfloor system may well suffice year round. Standard central heating pipes can also be installed in the floor as per normal although care must be taken to shield any copper pipes or fittings from coming into contact with cement (concrete / screed) as the copper will be chemically attacked by cement.
It’s usual to put the floor down before building anything vertical though in this case insulating the walls may be the wise thing to do first. Lining any area with a damp proof insulation will stop any damp progressing through timber or porous materials. Start by sticking the cellotex to the walls and taping the joins with waterproof tape. A blob of ‘no nails’ in the top corners should hold them up while you work. Then install the cellotex for the floor. Then install the chipboard on top. Then fix battens through the wall cellotex into the brickwork (so the battens sit on the chipboard floor) and screw plasterboard over the top. Taping the joins of the cellotex makes the cellotex itself the vapour barrier so no need for another sheet of plastic. Its also worth noting that any electrical cables tacked to the wall will interfere with the insulation so its usually better to route them on the room side as opposed to the wall side, simply slide some plastic conduit over the top and tape down to the insulation with gaffer tape.
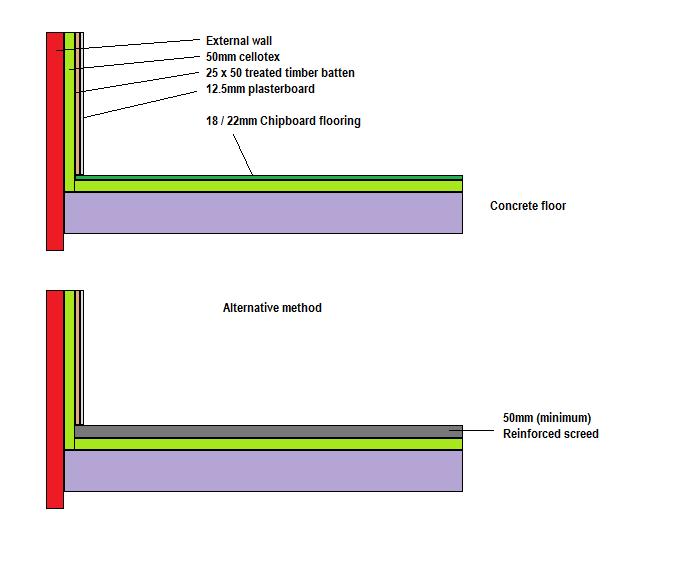
Example of an insulated floor can be seen in this image
A vapour barrier is a vapour impermeable sheet between a warm room and a cold hard surface thereby preventing the passage of moisture through the walls where it will condense on a cold surface such as the external walls where it will cause damage to anything water sensitive and collect where it can pool, not to mention creating little pools of life for micro organisms such as mildew. Should you decide to use an organic or non waterproof insulation you will need a separate vapour barrier which is installed between a water vapour permeable surface and whatever it is your trying to protect (insulation or timber studs) and is usually a standard plastic sheet such as damp proof membrane with any joints waterproof taped. On the floor it may be prudent to introduce a damp proof membrane underneath the insulation.
Whatever you decide to do with the floor it must adhere to current building regulations for adapting an existing structure. The required amount of insulation is different to a new build so much check the target ‘u’ value before work commences. It may well be that available depth and method of insulation requires a more expensive approach such as a ‘space blanket’ type insulation being added to a thinner ‘cellotex’ type insulation in order to achieve the target value with minimum depth. For more information please search the internet for approved document part L.
Ultimate handyman no longer links to any Government website as they keep moving or deleting the pages which leaves us with hundreds of dead links on our site. We cannot put a copy of the approved documents on this server as the documents are regularly updated and so you could be viewing an out of date document.