

Whether you are fitting taps to a new sink or replacing old ones these instructions should help, one thing to bear in mind that the Tap manufacturers do not tell you is that Chrome plated taps are considerably more resistant to the chemicals that are used in the bathroom. Gold plated taps often loose their gold plating quite easily.
If you are fitting a basin from new then you may be wondering which tap goes in which hole! Normally the Hot tap goes on the left hand side, this is so that people that are visually impaired know which tap they are using. If your taps are the incorrect way around it may be a good idea to fit them with the Hot on the left hand side and cold on the right hand side. In most cases if you fit the tap in the incorrect position you can simply swap the Hot and Cold part of the handle over.
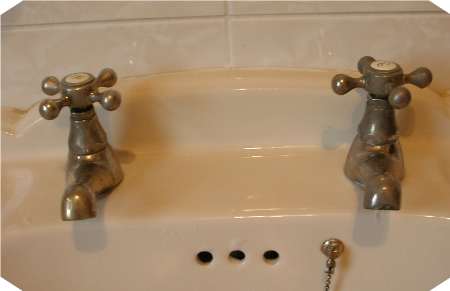
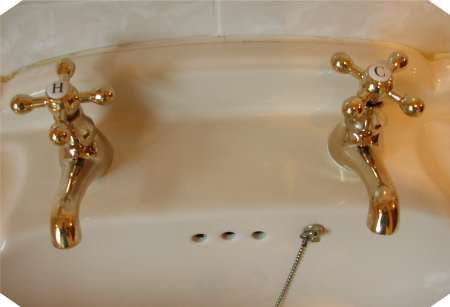
These taps are about 10 years old and started to loose their gold plating some years ago. We are now going to replace these with some new taps.
Changing or fitting taps is a lot easier with the correct tools-
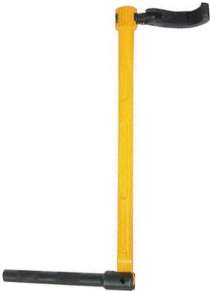
Adjustable Basin Wrench
The wrench end of this tool swivels round completely and can grip almost any size of nut.
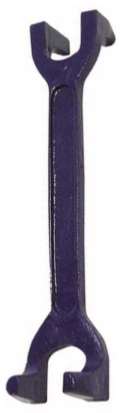
Basin Wrench
This is made from cast iron, one end fits bath tap connectors and the other fits basin tap connectors
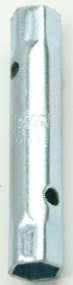
Box Spanner
This box spanner is specially made for fitting taps, one end fits the top hat nuts on Basin taps and the other end on Bath taps
Changing taps with the sink already fitted is often no easy task and can be extremely difficult and uncomfortable, having the correct tools will help but it is still difficult.
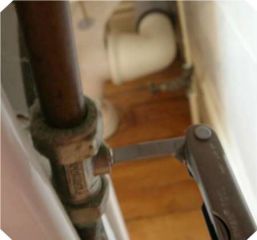
First we need to isolate the water supply, this is easy here as isolating valves have been fitted. Here I have used the flat screwdriver blade on a multi tool as access is restricted, simply turn the valve 90 degrees to isolate the water.
If you do not have isolating valves fitted you will have to isolate the incoming water supply either at the main stop cock, instructions on how to do this are here Isolate the water supply. Isolating the hot water could be simply a matter of closing a gate valve from the Cylinder, it depends on which system you have. If all else fails ensure the hot water boiler and immersion heater (if you have one) are switched off and that the main stop cock is isolated.
Open the downstairs taps and wait for the system to drain before attempting to fit the new taps.

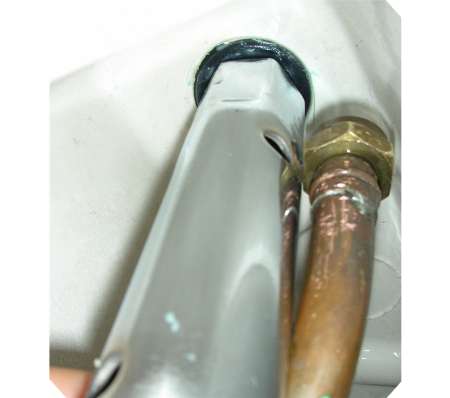
This is the view looking up behind the basin.
1. This is the securing nut which holds the tap to the basin, this is called a Top Hat Nut or flange nut.
2. This is the Tap connector, these come in two sizes 1/2 inch for basin taps and 3/4 inch for Bath taps.
Inside of the tap connector is a fibre washer which makes a watertight seal. If you are installing the basin from new there are far easier tap connectors that you can use, such as flexible push fit connectors, these make fitting taps very easy!

Once the water is isolated and the taps are in the open position we can start to remove them.
Here we are using the adjustable basin wrench, you need to have a practice with this as the wrench end needs to be the correct way to undo the nut. It needs turning anti-clock wise to remove it! This is the tricky part-Hold the tap with your other hand whilst you undo the tap connector nut from below using the adjustable basin wrench.
Undo the nut completely and gently pull the pipe clear of the Tap.
Once the nut has been undone you can remove it from the tap and gently push it to one side.
Now you can slide the box spanner over the top hat Nut, this also needs turning anti-clockwise whilst holding the tap. The box spanner has holes through it so that you can push a Tommy bar or suitably sized screwdriver through the holes to get some leverage to undo or tighten the nut.

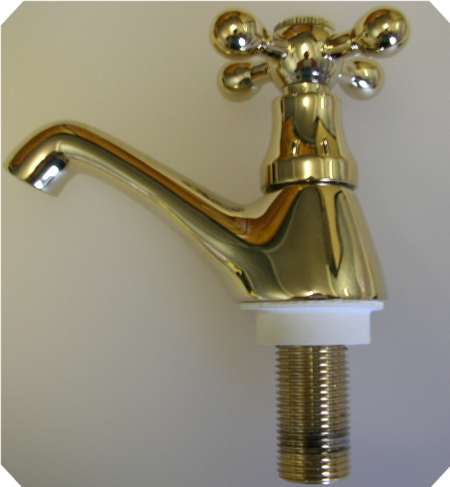
Doing D.I.Y is all about making it as easy as possible, one of the difficulties of fitting new taps is getting the tap centred in the hole in the basin, this is because the basin holes are too big for the taps to fit tightly.
There are several makes of these types of kit available, here we are using Fix-a-Tap, which consists of a large rubber washer to centre the taps, another thinner rubber washer for underneath and a metal washer to go between the top hat nut and the sink.These make fitting taps so much easier and is far better than the simple anti-rotation washer and top hat nut supplied with the taps.
You do not have to use one of these but they do make life easier. Basin taps get used frequently and if you use these it can prevent the tap from working loose!
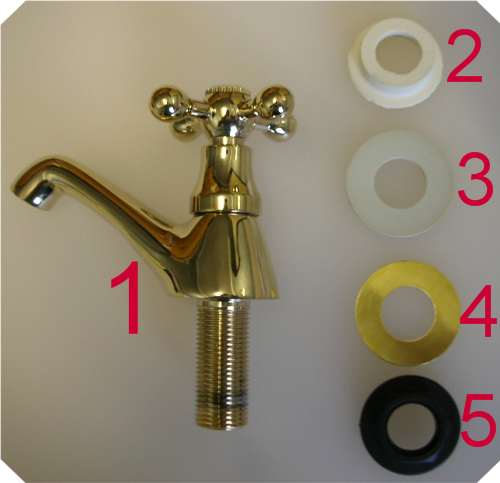
Here we have the following-
1. New Tap 2. Fix a tap large rubber washer, this slides over the threaded part of the tap. 3. Thin rubber washer, this slides onto the threaded part of the tap once it has been placed in the hole on the sink. 4. Metal washer, this slides onto the threaded part of the tap after the thin rubber washer. 5. Top Hat Nut, this goes on last and pushes the metal washer, which compresses the rubber washer onto the basin.
If you are not using a fix-a-tap washer kit or similar you will have to use the anti-rotational washer that came with the taps, simply push the tap through the washer, place it through the hole in the sink and screw up the top hat washer.
Here you can see that the tap has been pushed through the thick rubber washer (2). ( if you are not using a fix-a-tap kit then you will put the anti-rotational washer that came with the taps on instead)

The tap is now pushed through the hole in the basin. Now slide the thin rubber washer (3) onto the threaded part of the tap followed by the metal washer (4) and finally the Top hat Nut. Screw the top hat nut as far as you can by hand.
Hold the tap from above ensuring that it is in the correct position or get an helper to hold it. Now tighten the top hat nut using the box spanner and a suitable Tommy bar / screwdriver. The nut needs to be tight but do not over tighten it or it will crack as it is only plastic.
Obtain a new fibre washer, the correct size for the Tap connector, this is normally 1/2 inch for basins and 3/4 inch for baths. Remove the old washer from the tap connector and replace it with the new one.
Tighten the Tap connector by turning it clockwise, ensuring that it is not cross threaded and then tighten it up Using either an adjustable tap wrench or fixed tap wrench, whilst still holding the tap to prevent it from moving.
When the taps are fitted ensure that they are in the open position when you restore the water supply, leave them to flush for a short while so that no sediment etc. can get lodged in the tap and damage the washers. If you had to turn off the main stopcock to the property then leave the hot taps closed but leave the cold tap open slightly. Let the water run through the tap for 10 mins, slowly.
Then you can open the hot tap- this is to prevent any sediment that may of been disturbed from entering the Hot water system or boiler!