

Changing a light fitting is normally a simple task as long as certain procedures are followed. Replacing a light fitting like this is normally a quick job as long as you have the correct tools at hand.
| Before working on any electrical circuit you must ensure that it is isolated correctly and cannot accidentally be switched back on. Please read the article on safe isolation procedures before doing any electrical work. If you are not 100% certain what you are doing call a qualified electrician. Building regulations are changing all the time and modifying your home electrics could be against new rules and could invalidate your home insurance, if in doubt check first! |
Switching off the light at the light switch does not isolate the electricity to the ceiling rose or light fitting. You must isolate the circuit that you are working on from the consumer unit or fuse box!
Here we are going to be replacing a ceiling rose with a modern halogen light fitting.

This is the light fitting that is going to be replaced.
The first thing we need to do is to isolate the electricity by switching off the main switch on the consumer unit and removing the fuse, or by locking the consumer unit main switch in the off position.
Test the light to ensure it is isolated before continuing and follow the safe isolation procedures before continuing- Safe isolation procedures
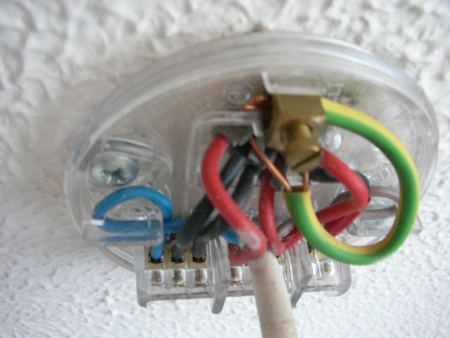
Unscrew the cover on the ceiling rose and the wires will be exposed. This is a basic loop in ceiling rose arrangement that is found in most homes in the UK.
We need to remove this to enable us to connect the new light. If you do not know which wire is the switched live wire then see-
Light wiring diagrams | Ceiling rose wiring diagrams
I have removed the two flex wires that were leading to the lamp and this has been removed. You can now see that there are three red wires in the middle terminal, these need keeping together.
The two black wires are the neutrals and the black wire on the left which is sleeved red is the switched live.
The green and yellow wires are earth wires.

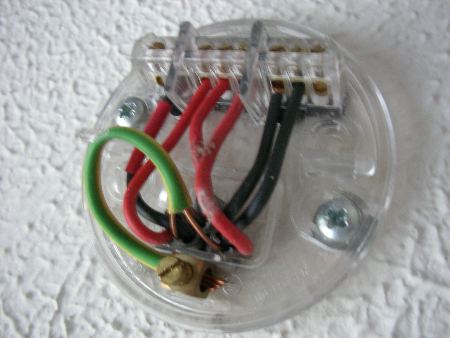
Because the switched live wire is identified this is going to be much easier. If the switched live wire is not sleeved or taped red then now is a good time to do this before removing the wires. Unscrew all the wires and remove them from the terminals and then remove the ceiling rose. It is not uncommon for the earth wires to be bare metal, if they are then they need sleeving with some green and yellow sleeving.
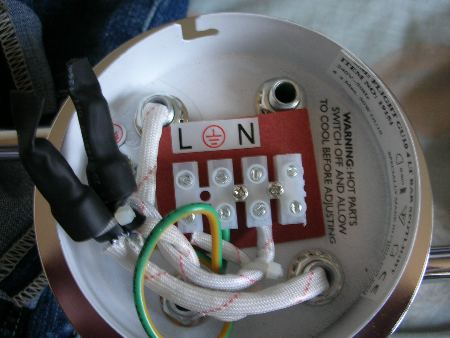
This is the new light fitting. You should follow the instructions with your light fitting carefully! Here we have the live, earth and neutral connections that we need to make the light function correctly.
Fasten the fixing bracket to the ceiling using some suitable fixings. Here I have used redi drivers. Ensure that the bracket is fixed firmly and that it is square to the wall (see below).
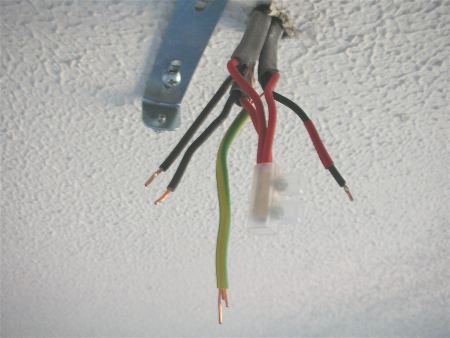
I said earlier that the three red wires needed keeping together, here I am fixing all three red wires into a terminal block, this will then be wrapped with insulation tape.

When fixing a bracket to the ceiling you can check that it is straight by taking two measurements from the wall!

Here you can see that the red wires have been terminated into a terminal block and wrapped with red insulation tape. The black wire that has the red piece of sheathing on goes into the Live terminal (marked L) and the two black wires go into the neutral terminal (marked N)

The green and yellow earth wire goes into the earthing terminal which looks like this

Check that the wires are tight in the terminals by gently giving them a pull. When you are satisfied that they are secure you can fix the light fitting to the bracket.
Ensure that no wires become trapped when it is being positioned.
You can now restore the power and enjoy your new light.