Ultimate Handyman DIY Home drilling and machining acrylic

Home | A-Z Contents | Arcade| DIY Forum | Directory | Disclaimer | DIY Videos |Safety First | Search


Drilling

Standard metalworking twist drills can be used for all normal drilling work with Perspex® from Lucite®. It is advisable to re-grind twist drills to give a zero rake; The diagram below shows the correct angle to grind the drill bit to.


Acrylic drill


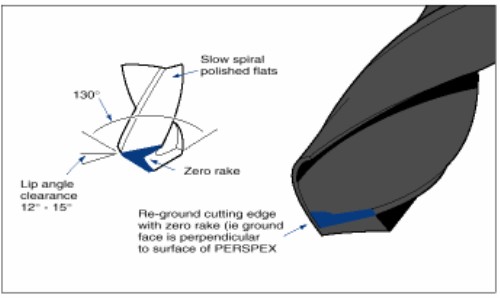
Standard drill (130°) with cutting edges re-ground for use with Perspex®


Wherever possible, the work should be supported by a back stop made from either scrap Perspex® or hard wood to prevent splintering the exit hole. Under no circumstances should a centre punch be used before drilling Perspex®. A small pilot hole should be drilled first to locate the drill. Coolants are strongly recommended for any deep drilling into Perspex® and time must be allowed to remove swarf from the drill at regular intervals. Hole saws may be used for larger holes greater than 12 mm diameter but when drilling large holes in thin extruded sheet, especially if it is not possible to support the work, "cone-cut" drills have been found to be particularly suitable.


Drilling acrylic 
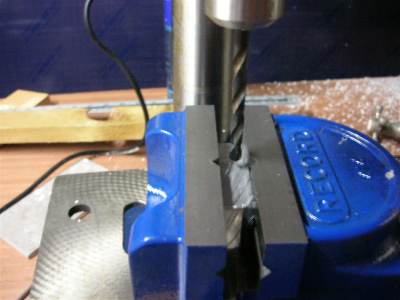
Using a bench drill is a good way to drill perspex, this way you can ensure that the hole is perfectly straight.


Remove swarf Be sure to stop the drill occasionally to remove the build up of swarf.


Turning

Perspex® can be turned on conventional metalworking lathes but it is important to keep the work cool by the use of coolants and ensuring that feed rates are slow. Any overheating of the work is likely to lead to localised distortions and a loss of tolerance. Crazing may also occur some time after. Correct grinding of the lathe tool is necessary. HSS tool bits are preferred, ground to zero rake at the top and 15 - 20° front rake. The fine grain texture of HSS tools ensures a better finish than TCT tools but all cutting surfaces must be kept very sharp. Cutting speeds of 90 - 150 m/min are typical for turning Perspex® but for a first class finish, speeds of 15 - 30 m/min are recommended. Diamond fly-cutting is particularly recommended where a good polished finish is required after turning.

Spindle Moulding

A spindle moulder is a useful machine for the rapid machining of Perspex®. Cutters designed for woodworking are suitable, two-bladed cutters being preferred. Spindle moulding is carried out dry as swarf is easy to remove.

Engraving

Perspex® is easy to engrave using pantographs or CNC engraving machines. Laser engraving can also be carried out to give remarkable fine detail on Perspex®. The use of coolants is generally unnecessary for mechanical engraving other than the use of a compressed air jet directed on to the cutting head to remove swarf and cool the cutter. Filling is best carried out using one of the usual setting waxes. Paints can be used but it is most important to use those paints intended for use with acrylic sheet and known to be compatible. When intending to engrave Perspex® and fill with paint, especially for outdoor use, annealing of the engraved sections before filling is strongly recommended to prevent subsequent crazing.

Routing

Routing is perhaps the most important machining operation used on Perspex® today. Fixed head, moving head or portable standard woodworking routers are suitable for Perspex® using the same cutter speeds as for wood:-Double edged cutters are preferred, ground and honed with a back clearance angle of about 12° or more.Routing is usually performed dry but provision must be made to clear all swarf from the work bench and keep the cutter cool. A compressed air jet directed at the work piece usually performs this task. HSS cutters give better results than TCT cutters although their life will be shorter. Regular sharpening is therefore necessary.

  Perspex® PDF Downloads
 

Download the complete Perspex  workshop manual 5th edition

Perspex® Colour chart

Perspex® Flourescent colour chart

Perspex® Frost® Colour chart

Get adobe reader


ACRYLIC CENTRE